Do you find it tricky to check primary oil on your Harley-Davidson? I know I did. Many beginners who have just bought their first Harley-Davidson don’t know how to check primary oil on Harley Davidson. This is why they often struggle with it. However, it is very easy as long as you have the right tools, and you know the right procedure.
Checking primary oil on a Harley-Davidson motorcycle is a simple process. All you’ll require is a few tools, some effort, and the step-by-step guide mentioned below.
Continue reading and find out the simple process and make sure primary oil is never a problem in your bike.
How to check primary oil on Harley-Davidson bikes
Knowing how to check primary oil on Harley-Davidson bikes regularly is very important. Not everyone wants to take their bikes to local dealers for maintenance and oil checking. This is why you need to know how to do it by yourself. It is essential to check the level of primary oil in your bike to ensure that it is running smoothly. This will not only give you better performance, but it’ll also ensure a longer lifespan of your bike without any problems.
As oils cycle through low and high temperatures, they break down and become thinner. This makes them less effective while also exhausting them. This is why you should regularly check primary oil levels to ensure that it is present in the right quality. Here is a simple step-by-step guide on how you can check primary oil on your Harley-Davidson bike.
The tools you’ll need to check primary oil on a Harley-Davidson bike
Here are the tools you’ll need for checking the primary oil levels of your Harley-Davidson bike.
- A screwdriver
- The correct primary oil
- A funnel
- The owner’s manual
- Step-by-step instructions
- A torque wrench
- A T27 Torque Bit
Step-by-step guide to checking primary oil on a Harley-Davidson bike
- The primary oil will always have to be checked on level ground. You need to ensure that your bike is standing on a level surface. It is recommended that you should check the oil levels whenever you’re fueling up the bike.
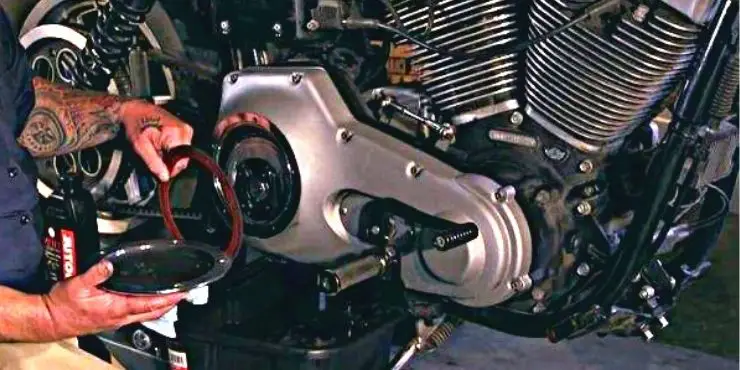
- For checking the primary oil, you will have to remove the derby cover. Use the socket wrench and T27 Torque bit for removing the cover. Use the tools to loosen up the five screws. Remember to keep the screws somewhere safe.

- After removing the derby cover, you will see a gasket. You can only re-use it once. Make sure that you clean it properly, as it’ll help with smoother functionality. Wipe any residual oil at the bottom of the gasket so that it doesn’t look like it is leaking. If you’re going to replace it, pull the old one out and add the new gasket right into place.
- Look down inside the primary. With the help of a light, look down, and you’ll see the primary fluid. It will be at the bottom of the clutch diaphragm. Ideally, you’ll want the level of the primary oil to be at the bottom of the clutch diaphragm. It must not be flowing out.
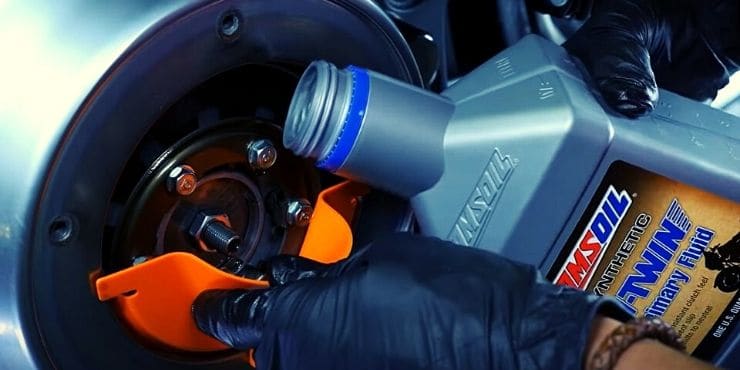
- If you notice that the primary oil level is low, and you cannot see the fluid in the clutch diaphragm, you will have to add the primary oil.
- Once you’ve checked the primary oil level, simply put back the derby cover and tighten the screws. Tighten them by torquing them to 90 inch-lbs.
How much oil will go in the primary?
Once you’ve checked and come to a conclusion that your Harley-Davidson bike needs more primary oil, you should add some. You should make use of the special funnel designed for a primary case. Harley-Davidson Softails need about one quart of primary oil. Make sure that you check the owner’s manual, as it’ll let you know the accurate oil capacity of the bike.
Once you have filled the primary case with the primary fluid, double-check the oil level visually. The primary oil needs to touch the bottom of the clutch diaphragm. Then, replace the primary cover and close it. After hand-tightening each screw, use a torque wrench and a T27 torque bit to tighten the cover. Your torque wrench must be set at 90 inch-lbs of torque. Make sure that you tighten them in a star pattern for added safety measures.
Is primary oil the same as motor oil?
The primary oil and motor oil, although similar in composition, serve different purposes. The two types of oil are formulated for protecting different areas of the bike. The primary oil is designed for protecting the primary chaincase components. While the viscosity of primary oil is similar to motor oil, they aren’t the same.
How often should Harley-Davidson bike’s primary oil be changed?
With Harley-Davidson motorcycles, you need to check the primary oil after every 10,000 miles. However, there are a few other things that you should be aware of as they’ll prompt primary oil change. Here are some signs that signify that an oil change is needed for your Harley-Davidson.
Check the primary oil and see if it is gritty and black
Many bikes come with a screen to check the oil level, while others have a dipstick for the same purpose. Whichever way you’re choosing, it is important to evaluate the oil color. The oil initially looks translucent with light-brown color, but it eventually becomes black and thick over time.
For verifying the thickness, you should take a small amount of oil and massage it on your fingers. The oil needs to feel smooth. If it isn’t smooth, and you find debris or grittiness, this implies that it is polluted. It is a sign the oil in your Harley-Davidson needs changing.
If the transmission system runs louder than normal
This is one of the little details you’ll pick up better than anyone else, as it is your motorcycle. You will have a better understanding of how your Harley-Davidson runs, feels, and sounds better than anyone else.
The noise from the transmission system needs to sound lovely when the oil is fresh. With time, the oil will dampen the sound quality, and eventually, you’ll start hearing a metal rubbing sound. Once you begin to notice this change, it is a hint that your bike needs a primary oil change.
The oil level is under the minimum mark
In case you notice that the level of oil keeps doing below the minimum mark on the screen or dipstick even after you’ve tested and topped the oil level, then this is a big problem.
In case the transmission system doesn’t leak, then it means it is a problem with the oil being too old. Therefore, it would be best to just change it as quickly as you can.
You’ve forgotten the last time that you changed the primary oil
A general rule of thumb is to change the primary oil once every month for your Harley-Davidson. In case you’ve forgotten the last time you changed the primary oil, it is an indication that now might be the time to change the oil. The next time, ensure that you’re writing down the oil change date. This way, you’ll be able to verify at future dates.
Dashboard warning light doesn’t go away
The modern engines come equipped with sensors that notify you that you don’t have enough oil in the engine. This is done through the lights on your bike’s dashboard. When the dashboard warning occurs, you can visually inspect the engine oil level. If needed, you should add the right amount of oil to get the oil level to the usual mark.
Conclusion
Thank you for reading. Hopefully, now you know all about how to check primary oil on Harley Davidson bikes. All you need to do is gather the important tools and then leave the rest to the step-by-step instruction guide mentioned above. That way, you’ll be able to check and replace the primary oil on your Harley-Davidson and keep it running smoothly for a long time.


