If you’re a Harley-Davidson enthusiast, you know that the forks are one of the most important parts of the bike. Knowing how to disassemble them correctly is key for maintenance and repair. Luckily, our step-by-step guide will help you do just that!
To disassemble Harley forks, lift the bike, remove the front wheel and brake caliper, and take off the fork caps. Drain the fork oil, slide the forks out of the triple tree, and remove the fork seals and internal components. Reassemble in reverse with fresh oil and new seals.
Whether you’re a novice or have some experience already, this guide will show you the best way to take apart the forks on your Harley. So, if you’re ready to learn the ins and outs of Harley-Davidson forks, let’s get started!
Tools and safety equipment needed before disassembling Harley forks
Harley-Davidson is an iconic American motorcycle manufacturer and it has captivated bikers worldwide with its legendary bikes and distinctive design. An integral component that contributes to the superb handling and stability of Harley-Davidson bikes is the fork.
In the realm of bikes, a fork refers to the front suspension component responsible for connecting the front wheel to the frame. It is an important structural element that supports the weight of the bike, absorbs shocks, and allows for smooth steering and handling. Harley-Davidson incorporates different types of forks across its lineup, including traditional telescopic forks and inverted forks, each with its own unique characteristics. Moreover, there are also different types of Harley-Davidson fork components available in the market.

When it comes to maintaining or customizing a Harley-Davidson motorcycle, disassembling the forks might be necessary. Properly executed fork disassembly will ensure smooth functioning, extend the lifespan of the components, and enable customization opportunities. However, it’ll be important to have the right tools at hand and observe essential safety precautions to avoid accidents and damage.
Here are the tools needed for disassembling the forks in a Harley-Davidson bike –
#1. Socket and wrench set
A comprehensive socket and wrench set will be important for removing various components, including the axle, axle nut, fork cap, and pinch bolts. Make sure that you have both metric and standard sizes to accommodate the different fasteners used in Harley-Davidson bikes.
#2. Allen and Torx keys
Harley-Davidson motorcycles often feature Allen and Torx fasteners in the fork assembly. You should invest in a set of high-quality Allen and Torx keys for safely removing and reassembling the forks without damaging them.
#3. Fork seal driver
A fork seal driver is used for installing new fork seals during reassembly. This specialized tool will ensure that the seals are properly seated, reducing the risk of leaks and maintaining optimal suspension performance.
#4. Fork spring compressor
A fork spring compressor is important when working with the fork springs. It will allow you to safely remove and install the springs, preventing potential injuries from spring tension.
#5. Fork oil level gauge
To ensure the correct amount of fork oil is added during reassembly, a fork oil level gauge will be invaluable. It helps in achieving proper suspension performance and preventing excessive or insufficient damping.
#6. Rubber mallet or soft hammer
A rubber mallet or soft hammer is useful for tapping and dislodging stubborn components without causing damage. It will help to avoid using excessive force and minimize the risk of accidental scratches or dents.
Here are some safety precautions you need to keep in mind when carrying out fork disassembly –
#1. Motorcycle securement
Before you begin any work on the forks, secure the bike on a sturdy stand or lift. This will ensure stability and prevent the motorcycle from tipping over during disassembly. You should engage the parking brake and use additional precautions like wheel clocks if available.
#2. Protective gear
You must always wear appropriate protective gear, including safety goggles, work boots, gloves, and more. These items will protect your eyes, hands, and feet from potential hazards such as chemicals, debris, or accidental contact with sharp edges.
#3. Release the pressure
Before you disassemble the forks, you must release any built-up pressure in the fork legs. This can be easily achieved by loosening the fork cap slowly. Failing to release pressure can result in the unexpected release of components or the spraying of fork oil.
#4. Handle fork oil properly
Fork oil can be quite harmful if it comes in contact with the skin or eyes. You must always use caution when handling fork oil and wear protective gloves. In case of any accidental exposure, you must promptly wash the affected area with soap and water.
#5. Take pictures
When disassembling, you need to consider taking clear pictures and videos of the fork assembly. These visual references can be quite helpful during reassembly, ensuring that the components are correctly aligned and installed.

How to disassemble Harley forks: Removing the front wheel
When it comes to disassembling the forks in a Harley-Davidson motorcycle, removing the front wheel is necessary. Here are the steps that will guide you through the process of removing the front wheel. By following these steps carefully, you’ll be able to safely remove the front wheel and proceed with disassembling the forks in your Harley-Davidson bike.
Step 1: Secure your bike
Before you start work, make sure that your bike is securely stabilized. Place it on a suitable motorcycle stand or lift to provide stability during the process. Engage the parking brake and use additional safety measures, such as wheel chocks to prevent the motorcycle from rolling or tipping over.
Step 2: Loosen the axle clamps
Make use of an appropriate socket or wrench and loosen the axle clamps on both sides of the front forks. These clamps will hold the axle in place and might require loosening bolts or nuts. Rotate the bolts counterclockwise for loosening them but avoid removing them completely at this stage.
Step 3: Remove the brake caliper
Locate the brake caliper mounted on the front fork. Depending on your Harley’s model, it might be secured with bolts or pins. Use the appropriate socket or Allen key to remove the caliper bolts or pins, and carefully detach the caliper from the brake rotor. Take note of any shims or spacers that might be present between the caliper and fork, as these will have to be reinstalled correctly.
Step 4: Loosen and remove the axle
Once the brake caliper has been detached, you can go on to loosen and remove the axle. Start by completely removing the axle clamps on both sides of the fork. With the clamps fully loosened, gently slide the axle out from one side of the fork. As you’re removing the axle, be cautious of any spacers or washers that might be present on either side. Take note of their position and orientation for reassembly later.
How to disassemble Harley forks: Removing the triple tree
Disassembling the forks in a Harley-Davidson motorcycle also requires removing the triple tree, which is responsible for holding the front end together. This process isn’t that complex as long as you know the right steps. Here are the necessary steps to follow to remove the triple tree safely and effectively to disassemble the forks.
Step 1: Loosen the top stem nut
First, you should locate the top stem nut on the upper triple tree. Depending on your bike, you might have to remove any necessary components like the handlebar clamp or instrument cluster to access the nut.
Using the appropriate size socket wrench or spanner, you should loosen the top stem nut by turning it clockwise. Make sure that you use the correct tool for avoiding damaging the nut. Once the nut is loose, you might have to loosen the top stem bearing preload. Refer to your Harley’s service manual for specific instructions on adjusting the bearing preload.
Step 2: Lower the handlebars
Locate the handlebar clamp bolts on the upper triple tree. Then, loosen them using the appropriate size socket wrench or Allen key. Make sure you’ve got sufficient clearance to lower the handlebars without any obstructions.
Gently lower the handlebars to the desired position. Take note of the original position if you want to restore it later. Pay close attention to any cables or wiring to ensure that they aren’t strained or damaged during the process.
Once the handlebars are in the desired position, you must tighten the handlebar clamp bolts evenly, alternating between bolts to ensure a secure grip on the handlebars. Make use of the torque specifications recommended in your bike’s owner’s manual.
Step 3: Check and remove the top stem
Examine the top stem for any signs of wear, damage, or corrosion. If you detect any issues, it might be necessary to replace the top stem before reassembly.
Depending on your bike, there might be a retaining bolt or pin securing the top stem. Remove the retaining mechanism and carefully slide the top stem out of the triple tree. If there is any resistance, you should apply gentle pressure or tap it lightly with a rubber mallet to release it.
As you’re removing the top stem, pay close attention to any washers, bearings, or spacers that might come off with it. Label and organize these components to make sure there can be proper reassembly later on.

How to disassemble Harley forks: Remove the forks
When you’re servicing or customizing your Harley-Davidson bike’s forks, removing them might be needed. Here are the steps that will guide you through the process of verifying and removing the forks. By following these steps carefully, you can easily remove the forks and proceed with your desired maintenance or customization tasks on your Harley-Davidson bike.
Step 1: Verify and remove fork caps
Locate the fork caps on the top of each fork leg. These caps are typically secured with bolts or screws and might be covered by rubber or plastic caps for aesthetic purposes. You should carefully remove the rubber or plastic caps to access the fork caps underneath. Make use of the appropriate socket or wrench to loosen and remove the fork caps, rotating them counterclockwise. Take note of any washers or spacers beneath the caps as they’ll have to be reinstalled correctly during reassembly.
Step 2: Drain the fork oil
For draining the fork oil, you’ll have to locate the drain screws on the bottom of each fork slider. Position a drain pan under the fork to catch the oil. Using the appropriate socket or wrench, loosen and remove the drain screws. Allow the fork oil to drain completely. Be patient as it might take a while for all the oil to fully drain out.
Step 3: Separate the fork sliders
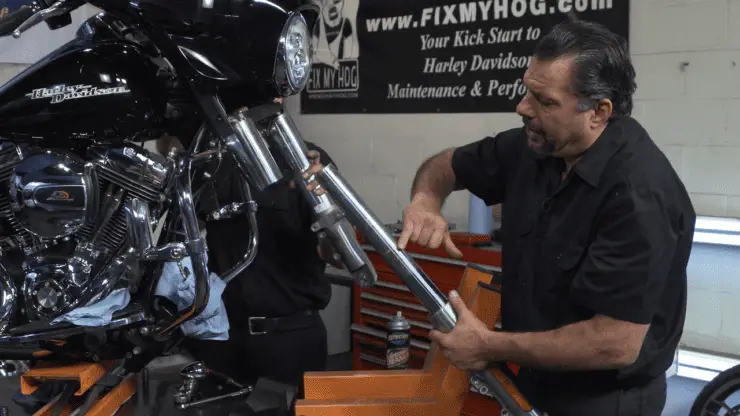
With the fork caps removed and the fork oil drained, you can now separate the fork sliders. The fork sliders are essentially the lower part of the forks and they house the fork tubes and other internal components. Firmly grip the fork sliders and apply a gentle downward force while pulling them apart. Ideally, they should separate ideally, allowing you to remove the fork sliders from the motorcycle.
Step 4: Inspect and continue with maintenance or customization
With the forks removed from your Harley-Davidson bike successfully, you must take the opportunity to inspect the fork tubes, seals, and other components for any signs of damage, wear, or leaks. If any parts need replacement or servicing, you must consult the manufacturer’s service manual for the appropriate procedures. You can even proceed with your desired maintenance or customization tasks at this point, such as replacing fork seals or installing aftermarket components.
How to reassemble the forks in your Harley-Davidson bike
After you have disassembled the forks of your Harley-Davidson bike for maintenance or customization purposes, reassembling them correctly will be crucial for optimal performance and safety. Here are the steps that will help you reassemble the forks in your Harley-Davidson motorcycle. By following these steps, you will be able to ensure a successful reassembly of the forks in your bike.
Step 1: Reassemble the fork sliders
Begin by aligning the fork tubes with the fork sliders. You should carefully slide the fork tubes into the fork slider. Make sure that they fit snugly and evenly. Apply a small amount of fork oil or grease to the fork tube surface to ease the assembly process. Use caution to prevent damaging the fork seals as you insert the fork tubes.
Step 2: Install new fork seals
If you’re replacing the fork seals, now will be the ideal time to install the new ones. Make sure that the fork tubes are clean and free from any debris. Gently slide the new fork seals onto the fork tubes, ensuring that they sit properly in their designated grooves. Apply a thin layer of fork oil or silicone grease to the fork seal lips for lubrication and to prevent tearing.
Step 3: Fill the fork tubes with oil
To fill the fork tubes with oil, you must refer to the manufacturer’s recommendations for the appropriate oil viscosity and the correct amount of oil to be used. Make use of a graduated cylinder or a specialized fork oil measuring tool for measuring the precise amount of oil required. Slowly pour the oil into the fork tubes, taking care that you do not spill or overfill. Allow the oil to settle down and remove any trapped air bubbles by gently compressing the forks several times.
Step 4: Reattach the fork caps
With the fork tubes filled with oil, it’ll be time to reattach the fork caps. Place any required washers or spacers onto the fork tubes, ensuring that they are correctly positioned. Align the fork caps with the fork tubes and thread them on carefully by hand. Once hand-tightened, use the appropriate socket or wrench to tighten the fork caps securely. Be cautious that you don’t overtighten as it might damage the threads or other components.
How to reassemble Harley forks: Reattach the triple tree
Reassembling the forks in your Harley also involves several important steps, including reinstalling the triple tree. This phase is important for ensuring proper alignment and stability in the front end of your bike. Here are the steps that will walk you through the process of reattaching the triple tree safely and efficiently.
Step 1: Install the top stem
Start by carefully aligning the top stem with the fork steering head. Make sure that the bearings or bearing races are seated correctly in the steering head. Gently slide the top stem into the steering head, ensuring that it goes in smoothly and evenly. If needed, make use of a rubber mallet or soft hammer to tap the top stem into place, taking care not to damage any components.
Step 2: Raise the handlebars
With the top stem installed, it will be time to adjust the handlebars to the desired height. Depending on your preference and the availability of compatible accessories, you can make use of handlebar risers or extensions to raise the handlebars. Follow the manufacturer’s instructions to properly install and secure the risers or extensions, ensuring that they are correctly aligned with the top stem.
Step 3: Tighten the top stem nut
Once the handlebars are in the desired position, it’ll be important to securely tighten the top stem nut. Using an appropriate socket or wrench, tighten the top stem nut to the manufacturer’s recommended torque specification. Be cautious that you don’t overtighten as it might damage the bearings or affect the steering functionality. Using a torque wrench will ensure accurate tightening.
How to reassemble Harley forks: Reattach the front wheel
After you have completed the reassembly of the forks in your Harley-Davidson motorcycle, reattaching the front wheel will be the final step before you can do the final checks. Here are the steps that will guide you through the process of reattaching the front wheel of your Harley-Davidson bike after you have disassembled and reassembled the forks. By following these steps, you can ensure a secure and properly functioning front wheel in your Harley-Davidson bike.
Step 1: Place the axle and washers
Start by positioning the front wheel in between the fork sliders. Slide the axle through the front wheel’s axle hole, ensuring that it goes through both fork sliders. As you insert the axle, make sure that the axle spacers or washers are correctly positioned on either side of the wheel. These washers will help maintain proper spacing and alignment.
Step 2: Tighten the axle clamps
With the axle in place, proceed to tighten the axle clamps. Locate the axle clamps on both sides of the fork sliders. With the help of an appropriate socket or wrench, tighten the axle clamp bolts or nuts, and make sure they are securely fastened.
Be cautious that you do not overtighten as it might damage the axle or fork sliders. Follow the manufacturer’s recommended torque specifications for proper tightening.
Step 3: Reattach the brake caliper
Now, it’ll be time to reattach the brake caliper. Align the caliper with the brake rotor and carefully insert the caliper bolts or pins through the designated holes. Make sure that the bolts or pins are correctly positioned and aligned with the caliper mounting brackets on the fork sliders. Use the appropriate socket or Allen key to tighten the bolts or pins, securing the brake caliper in place.
Final checks and testing after reassembling the forks on your Harley-Davidson bike
After you have reassembled the forks in your Harley-Davidson bike, it will be important to carry out thorough checks to ensure the safety and optimal performance of your bike. Here are the steps you need to follow to carry out the important post-reassembly checks. By following these steps carefully, you’ll be able to confidently assess the quality of your reassembly work and address any issues before hitting the road.
Step 1: Check the torque settings
Start by verifying the torque settings of all the fasteners involved in the reassembling process. By making use of a torque wrench, ensure that all nuts, bolts, and clamps are tightened to the manufacturer’s specified torque values. Pay close attention to critical components such as axle clamps, fork caps, handlebar fasteners, and brake caliper bolts. Remember, overtightening could damage components whereas undertightening might compromise stability and safety.
Step 2: Test the steering
Testing the steering will be important to ensure that the front end of your Harley-Davidson motorcycle operates smoothly and responsively. With the bike securely stabilized, sit on your Harley and turn the handlebars to full lock. Pay close attention to any resistance, binding, or abnormal noise. The steering should move freely without any hesitation or interference. If you’re encountering any issues, you should double-check the alignments of the front wheel, axle, and fork assembly.
Step 3: Check the brake performance
After reassembling the forks, it is important to assess the brake performance to guarantee effective stopping power. Begin by pumping the brake lever to ensure proper engagement and firmness. Check for any excessive lever travel or sponginess. Inspect the brake pads for even wear and proper alignment with the brake rotor. If needed, you should adjust the brake caliper position or bleed the brake system to ensure optimal performance.
Step 4: Evaluate suspension functionality
As a part of the post-reassembly checks, you must evaluate the functionality of the suspension system. Compress and release the fork multiple times for assessing smoothness, responsiveness, and absence of any unusual noises or resistance. Moreover, you should check for proper rebound damping to ensure that the forks return to their normal position smoothly after compression.
Step 5: Conduct a test ride
After you have completed the essential checks, take your Harley-Davidson motorcycle for a test ride in a controlled environment. Begin with low-speed maneuvers, checking for stability, handling, and any abnormal behavior.
Gradually increase your speed and assess the motorcycle’s performance, paying attention to steering responsiveness, brake effectiveness, and suspension behavior. If you’re noticing any issues or concerns, address them promptly before riding in regular traffic.
FAQs
What tools are needed to disassemble Harley forks?
The tools needed to disassemble Harley forks will vary depending on the specific model of Harley and the type of fork. Generally, you will need a set of Allen wrenches, a screwdriver, and a set of pliers. You may also need a set of specialty tools, such as a bearing puller and a bearing press, depending on the model.
What are the steps for disassembling Harley forks?
The steps for disassembling Harley forks will vary depending on the specific model. Generally, the process involves removing the axle, unscrewing the top cap, and then removing the springs. Next, you will need to remove the dampers, spacers, and other components. Finally, you will need to remove the stanchions and fork tubes.
What should I do if I need help disassembling my Harley forks?
If you need help disassembling your Harley forks, it is best to consult the owner’s manual or seek out the assistance of a qualified technician. The process can be complex and it is important that you have a thorough understanding of the process before attempting to disassemble the forks.

