Have you been experiencing issues with a faulty ignition switch, and you’re worried you cannot start your bike? Don’t worry, there are ways you can work around a faulty ignition switch and start your bike.
Bypassing a Harley ignition switch is illegal and not recommended. It can compromise the bike’s security system and cause damage to the electrical components.
If you’re having problems with your Harley-Davidson ignition switch, then you should take a look at this article. It’ll show you how to bypass a Harley ignition switch and start the bike without any issues.
How to bypass a Harley ignition
Suppose your bike has a faulty ignition switch, but you still need to start it, what will you do? Similarly, what if you got into an accident and the ignition switch got affected, can you still start the bike? For such situations, you’ll need to know how to bypass a Harley ignition. There are multiple ways through which you can bypass the ignition switch and directly start your Harley-Davidson bike. One of the go-to ways to bypass a Harley-Davidson bike’s ignition switch is to hotwire the bike.
While this way will work, it isn’t normally recommended as it offers an obvious sense of danger. Instead, it is recommended that you should take your bike to a Harley-Davidson dealer and get the ignition switch repaired.
How to hotwire your Harley-Davidson bike?
Starting your Harley-Davidson bike while bypassing the ignition switch can be crucial in certain situations. By hotwiring your bike, you can start it without using a key or an ignition switch. There are a couple of tools you’ll need and a few simple instructions you’ll need to follow. As long as you’re careful, you’ll be able to hotwire your Harley-Davidson bike within moments. Moreover, keep in mind that this isn’t a process recommended by experts.
Tools needed
For hotwiring your Harley-Davidson bike, you’ll need to arrange a speaker wire. In fact, any conductive wire will do the job. In case you don’t have a wire in your garage, you can purchase one from a nearby store. Ensure that the chosen wire is around 3 to 4 inches. This will be the wire that will act as the fake key for switching on the bike.

Steps to hotwire your Harley-Davidson bike
Hotwiring is a fairly common way of turning on your bike while skipping the ignition switch and without using keys. The entire process will involve a few steps. You will definitely succeed as long as you carefully follow the instructions.
1. Trace the wires
Go to your Harley-Davidson motorcycle’s ignition system and carefully trace the wires. In most bikes, the wire will come covered, whereas others don’t. The best way of locating the wires would be to use the motorcycle’s handlebars. You will find that the wires are usually red, black, or green.
2. Confiscate the plastic socket
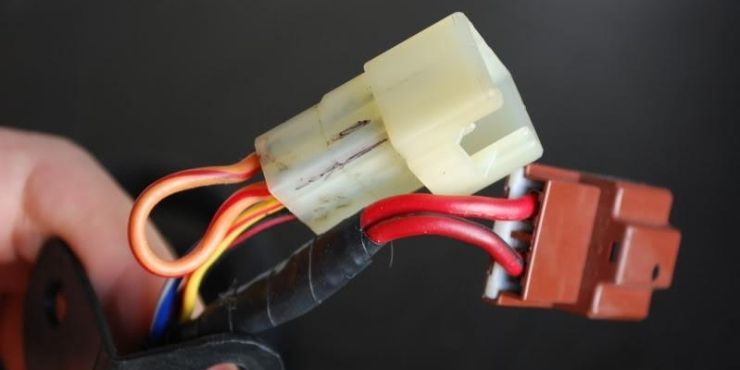
Once you’ve identified the wires, you’ll see that there are three wires going from the handlebars. These wires will be covered as a single bunch in the plastic socket. You should ensure that you find the socket and then using your hands, separate the wires from the plastic socket.
There will be caps of two natures. One of them will come from the cap while the other one will connect the wires. In this case, the only wires that you’ll need are the ones that are coming from the cap. You will have to separate them from the wires that go to the handlebars.
3. Attach the speaker wire to the plastic socket
This is the most important step when you’re hotwiring the bike. The wires are the most important aspect of this process, and you’ll need to be careful when working with them. For hotwiring your Harley-Davidson motorcycle, you should attach the wire to the socket. Then, try to pull the cap that separates the wires connecting to the handlebar. Now, you should insert one side of the wire inside the socket while having the other side on the other end of the socket.
4. Tap the ignition button
Once you’ve inserted the speaker wire in the respective place, you’ll notice that the lights have lit up. Once this happens, you should press the ignition button. Once you tap the button, you’ll hear the engine sounds and your Harley-Davidson motorcycle is ready to hit the road. For ensuring that the wires don’t fall off, you can make use of tape and stick them in place.
Safety precautions to take when hotwiring your bike
The easiest way to hotwire your bike would be to use the speaker wire and plastic socket method. This method is pretty safe but you’ll still have to follow a few safety guidelines.
- Try to make use of covered wire. The covered wires will be far safer than naked wires or safety pins. This is the case because exposed wiring could end up creating a short-circuit issue and damage the battery.
- When plugging the wire into the socket, you might face a minor spark. However, you shouldn’t be afraid as this won’t be a problem if you’re careful.
- Seal the wire with tape so that it doesn’t come off easily. Moreover, be careful as you wouldn’t want someone stealing your Harley-Davidson bike.
Take your Harley-Davidson bike to a dealer and get the ignition switch repaired
Typically, you will get an idea that you have a faulty ignition switch, and you should get it repaired. You will be unable to turn on your bike and a few other issues will arise. The ignition switch will also add the element of jamming, jiggling, and rough turning. You might want to repair it yourself, but you should take it to a Harley-Davidson dealer. Taking it to a dealer will be the best-case scenario for you and your bike.
While getting the ignition switch repaired is a critical issue, it often gets pushed back as people find a way to jiggle the keys and start the bike. The repair keeps getting pushed back until it becomes too big an issue. The best way to get your bike repaired cheaply would be to take it to a dealer before you have to pay for a tow truck. You must find a decent mechanic who specializes in ignition switches and book an appointment. Ignition switch repairs can be easily completed within the same day. However, be aware as it’ll cost you a decent sum.
What is the typical cost for Harley-Davidson ignition switch replacement?
The typical estimated cost of the ignition switch will be between $60 and $100. Meanwhile, the estimated labor cost will be between $75 and $150. This means that you can expect to spend between $135 and $250 for getting the ignition switch replaced.
The cost will be largely dictated by the model and build of your Harley-Davidson bike. However, the condition of your bike’s lock cylinder will play a key role as well. Many ignition switches will come priced at $60 to $100 depending on the complexity. Some of them are a part of an assembly with the lock cylinder while others form a security device.
In high-end scenarios, the prices could rise between $200 and $400. For the most part, an ignition switch is a straightforward repair with the labor costs being between $75 and $150. If the key isn’t turning despite your best attempts, the labor prices will increase. This increase will be because removing it will require turning the cylinder. If the security systems are attached to the ignition switch, then further programming would be needed. Recoding the keys will then add a further $100 to the bill.
Replace the ignition switch on your Harley-Davidson bike by yourself
Sometimes, it might not suit your budget to pay over the odds for getting the ignition switch replaced. While getting it replaced by an expert is the recommended option, you can also replace it by yourself. All you’ll need to do is arrange for the new ignition switch and replace the previous one. However, you’ll need to know the right way to do that.
1. Position your bike
Position your bike on a flat, level surface with decent lighting. Ideally, you should prefer setting it up outdoors as long as the weather is clear and bright.
2. Disconnect the bike’s battery
Before you go further, you should disconnect the battery. Remove the side for accessing the ignition area of your bike and set it aside. Start by removing the negative terminal wire lead and then remove the positive terminal wire lead. You should never remove the positive first; otherwise you could short circuit the battery.
3. Loosen the bolts
Loosen the Allen head and pinch bolts that are holding the upper triple tree to the front forks.
4. Remove the damper
Remove the steering damper in case your bike has one. Unscrew the bolts holding it up on the upper triple tree. However, leave the opposite end of the steering damper attached to the bike’s frame. You can simply pivot it opposite the triple tree and move on.
5. Remove the triple tree
Now, remove the 32 mm nut and washer holding down the upper triple tree to the steering stem. Pull the upper triple tree off the stem and form. Trace the wiring until you’ve located the connector in your bike. Disconnect the connector by simply separating the ignition from the wiring harness.
6. Remove the faulty ignition switch and install the new one
Set the ignition switch facing down and then locate the bolts that are holding it to the underside of the triple tree. You’ll notice that the ignition switch is secured with either one-time use bolts or hex head bolts. Regardless of the bolts, they must be removed using a bolt extractor tool.
Remove the faulty ignition switch from the upper triple clamp. Replace the old ignition switch with a brand new ignition switch. Re-install the switch by reversing the steps and checking if the new switch works properly.
Conclusion
Thank you for reading. Hopefully, now you know a lot more about ignition switches in a Harley-Davidson, how to bypass a Harley ignition switch, hotwiring a bike, and more. Remember, there are multiple ways you can start your Harley-Davidson bike even if the ignition switch isn’t working. Hotwiring always works but it isn’t the recommended route to take. You should always look to take your bike to an expert and get the ignition switch repaired.

