Welcome, Harley enthusiasts! If you’re here, you’re likely looking for a step-by-step guide to keep your stock Harley air filter in top shape. Keeping your air filter clean is essential to getting the most out of your riding experience and ensuring your bike runs properly.
To clean a stock Harley air filter, remove it from the housing, rinse it with warm soapy water, let it air dry completely, then reinstall. For reusable filters, re-oil the filter as specified before reinstalling.
In this article, we’ll walk you through the process from start to finish. So, if you’re ready to get your hands a little dirty, let’s get started!
Overview of stock air filters on Harley-Davidson bikes
Harley-Davidson motorcycles are popular for their powerful engines, iconic designs, and unique sound. An important component of any Harley is its air filter, which plays a key role in the performance of the bike.
An air filter in a Harley-Davidson motorcycle is a crucial component of the bike’s engine as it is helpful in preventing dirt, dust, and debris from entering the engine. It is responsible for filtering the air that the engine needs to combust the fuel, ensuring that only clear air is entering the engine. A clean air filter helps in improving the bike’s performance, whereas a dirty air filter can reduce the fuel efficiency and even cause damage to the engine.
Harley-Davidson offers a wide range of Harley-Davidson Air Filters for its motorcycles, but most stock air filters are made using paper or synthetic fibers. These filters are designed to be a direct replacement for the original air filter and provide ample filtration for most riders. However, for people who want to increase the performance of their bikes, there are many other options available.

A popular aftermarket air filter option is the high-flow air filter, which is designed to allow more air to flow into the engine. High-flow air filters are made using foam or cotton gauze, which can provide increased airflow and better filtration compared to stock air filters. These filters are a popular choice for bikers who want to improve the performance of their bike without modifying the engine.
Stock air filters on Harley-Davidson motorcycles are designed to offer adequate filtration for most bikers. They are a reliable option for bikers who want to maintain the original performance of their bike. However, for people who want to increase the performance of their bikes, aftermarket air filters are certainly a popular choice.
It is important to note that aftermarket air filters could affect the motorcycle’s warranty, as any modifications made to the bike could void the manufacturer’s warranty. It is also important to make sure that any aftermarket air filter is compatible with the motorcycle’s engine and doesn’t cause issues with the bike’s performance.
Benefits of cleaning the Harley air filter regularly
An important part of any Harley-Davidson motorcycle’s engine is the air filter, which plays a key role in ensuring that the engine runs smoothly. Over time, air filters can get clogged with dirt and debris, reducing the effectiveness and potentially causing damage to the engine. There are numerous benefits of cleaning stock air filters on Harley-Davidson bikes. Here are some of the primary benefits –
#1. Improved performance
One of the most significant benefits of cleaning air filters on a Harley-Davidson motorcycle is improved performance. A clean air filter will allow for better airflow to the engine, which can greatly help in increasing torque and horsepower. This increased performance can make your Harley-Davidson motorcycle feel more responsive and can help in improving fuel efficiency.
#2. Reduced engine wear
A dirty air filter can cause dirt and debris to enter the engine, potentially causing damage to engine components. By cleaning the air filter regularly, you’ll be able to reduce the risk of engine wear and prolong the lifespan of the engine. This can help you save money on costly repairs down the line, while also helping you keep your bike running smoothly.
#3. Better sound
The sound of a Harley-Davidson motorcycle is definitely one of the most iconic aspects of the legendary American motorcycle brand. A clean air filter will help to improve the bike’s sound by allowing for better airflow to the engine. This improved airflow will make your bike sound deeper and more powerful, while enhancing the overall riding experience.
#4. Extended service life
Regularly cleaning the stock air filter on your Harley-Davidson motorcycle can help to extend the service life of the filter. This can save you a lot of money on replacement filters over time and help to ensure that your bike is running at its best.
#5. Improved resale value
Lastly, regularly cleaning the air filter on your Harley-Davidson motorcycle can help to improve its resale value. A well-maintaining Harley is generally worth more than one that has been neglected, and a clean air filter is a clear sign that the motorcycle has been well-cared for.

Tools and safety gear needed for cleaning Harley air filters
Cleaning the air filter on your Harley-Davidson motorcycle is an important part of maintaining your bike’s performance. When it comes to cleaning the air filter on your Harley-Davidson motorcycle, having the right tools and safety gear will be important. By having the appropriate tools and materials, you’ll be able to carry out the process of cleaning stock Harley air filters easily. Further, gathering the proper safety gear to protect yourself while cleaning, the air filter will keep you safe throughout the process. Here is a closer look at the tools and safety gear needed for cleaning stock Harley air filters –
Tools and materials required
#1. Screwdriver or socket wrench
Depending on the model of your Harley-Davidson motorcycle, you might require a screwdriver or socket wrench for removing the air filter cover. It is essential that you have the right tool to avoid damaging the screws or bolts.
#2. Air filter cleaner
Harley-Davidson recommends that you should use their specific brand of air filter cleaner for optimal performance and best results. There are other brands of air filter cleaner also available in the market, but it’ll be smarter to go for Harley-Davidson. Regardless of the option you’re choosing, make sure that you read the instructions carefully before use.
#3. Air filter oil
Once you have cleaned the air filter, it will be important to apply a thin layer of air filter oil to help trap any dirt and debris. Further, Harley-Davidson recommends that you should go for its specific brand of air filter oil, although there are other brands also available.
#4. Clean rags
Having clean rags on hand will be important for wiping down the air filter and other parts of your Harley-Davidson motorcycle during the cleaning process.
#5. Bucket or plastic container
Having a bucket or plastic container to hold the cleaning solution could make the cleaning process easier and prevent any spills.
Safety gear and equipment
#1. Eye protection
Eye protection will be important when cleaning the air filter on your Harley-Davidson motorcycle. When using air filter cleaner or compressed air, dirt and debris can be dislodged and can fly into your eyes. Wearing safety glasses or goggles will help prevent any dirt or debris from entering your eyes and causing harm.
#2. Respirator mask
Wearing a respirator mask is highly recommended when you’re cleaning the air filter on your Harley-Davidson motorcycle. Air filter cleaners and other chemicals used in the cleaning process can be quite harmful if inhaled. A respirator mask will prevent you from inhaling any dust particles or any harmful chemicals during the cleaning process. You should ensure that the mask fits snugly on your face to prevent any chemicals or particles from entering through the sides.
#3. Gloves
Wearing gloves is a key part of protecting your skin from any harmful chemicals or debris that might come into compact while cleaning the stock air filter. It is important that you choose gloves made of a material that is resistant to the chemicals used in the cleaning process. Nitrile gloves are a great option as they are chemical resistant and offer great tactile sensitivity.
#4. Protective clothing
Wearing protective clothing will help prevent any chemicals or debris from coming in contact with your skin. Long sleeves and chaps made using a material that is resistant to chemicals are recommended. This can include materials like Tyvek or other chemical-resistant materials. It is also important that you wear clothing that fits snugly to prevent any loose fabric from getting caught in the cleaning process.
Preparing to clean the air filter
Maintaining the air filter of your Harley-Davidson bike is undoubtedly an important part of the overall maintenance of your Harley-Davidson motorcycle and keeping it running smoothly. Before you can start cleaning the air filter, you will first need to prepare the work area and remove it from the bike. This will allow you to carry out the process easily and seamlessly.
Prepare the work area
Here are the steps that you should follow to prepare the work area for cleaning the stock air filters of your Harley-Davidson motorcycles –
#1. Find the workspace
Find a clean, well-ventilated workspace to clean the air filter. It is important to work in an area with good airflow to prevent inhaling any chemicals or dust particles.
#2. Cover the area with a cloth
Cover the work area with a drop cloth or newspaper to catch any debris or chemicals that may spill.
#3. Gather the tools and materials
Gather all the tools and materials you will need for the cleaning process, such as the air filter cleaner, gloves, and a brush or cloth.
#4. Gather the safety gear
Make sure you have all the necessary safety gear, such as eye protection and a respirator mask, before beginning the cleaning process.
Remove the air filter
Here are the steps that you should follow to remove the air filter of your Harley-Davidson motorcycle –
#1. Let your bike cool down
First, you should make sure that your motorcycle is turned off and cooled down.
#2. Locate the air filter
Locate the air filter on your bike. On most Harley-Davidson models, the air filter is located on the side of the engine, behind the cover.
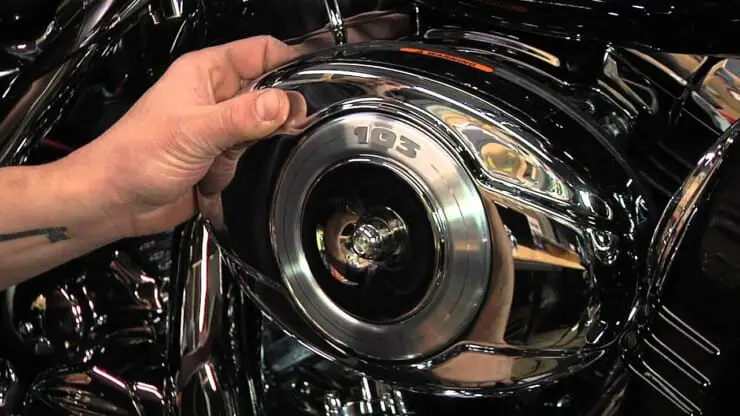
#3. Remove the air filter cover
Next, you will need to remove the air filter cover. This can usually be done with a screwdriver or Allen wrench, depending on the model.
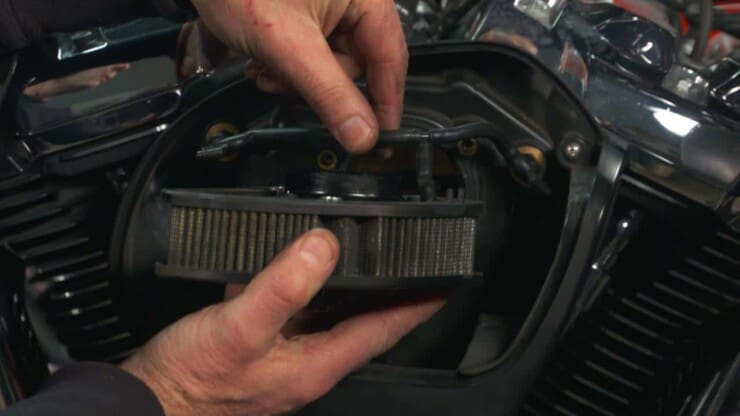
#4. Remove the air filter
Carefully remove the air filter from the housing, being careful not to damage it. It may be necessary to disconnect any hoses or electrical connections, depending on the model.

How to clean your stock Harley air filter
Once you have prepared the work area and removed the air filter, the next step would involve cleaning the air filter process on your Harley-Davidson bike. You will need to wash the filter, dry it, and lubricate it. Here is how to clean your stock Harley air filter –
Wash the air filter
Here are the steps that you should follow to wash the air filter of your Harley-Davidson motorcycle –
#1. Spray the air filter cleaner
First, you should spray the stock air filter with the recommended air filter cleaner. Make sure that you are following the instructions on the product.
#2. Scrub the filter
Use a soft-bristled brush or cloth to gently scrub the filter, being careful not to damage the filter.
#3. Rinse the air filter with water
Next, you will need to rinse the filter thoroughly with water, making sure to remove all traces of the cleaner.
#4. Repeat the process
Lastly, you should repeat the washing process if necessary.
Dry the filter
Here are the steps that you should follow to dry the air filter of your Harley-Davidson motorcycle –
#1. Gently pat with a clean cloth
You should shake the excess water off the filter and make use of a clean cloth to gently pat it dry.
#2. Let the air filter to air dry
Then, you should allow the stock air filter to air dry completely before you install it. Remember not to use a heat source or compressed air to speed up the drying process, as this could damage the filter.
Lubricate the filter
Here are the steps that you should follow to lubricate the air filter of your Harley-Davidson motorcycle –
#1. Apply air filter oil
Apply a small amount of the recommended air filter oil to the filter, following the instructions on the product.
#2. Spread the oil evenly
You can make use of a clean cloth to spread the air filter oil evenly over the filter. Be careful that you don’t over saturate it.
#3. Let the filter sit and squeeze to remove excess oil
Lastly, let the air filter sit for a few minutes to allow the air filter oil to absorb into the filter. Gently squeeze the filter to remove any excess oil.
Reinstall the air filter
Once you have thoroughly cleaned, dried, and lubricated the air filter on your Harley-Davidson motorcycle, the next step would be to re-install the filter and test it. Here is how you can do that –
Secure the air filter
Here are the steps that you should follow to secure the air filter of your Harley-Davidson motorcycle after cleaning it –
#1. Check the housing
Before securing, you should check the air filter housing for any dirt or debris and clean it if necessary.
#2. Insert it back into the housing
Then, you should insert the air filter back into the housing. Make sure that it is seated properly.
#3. Replace the screws
Replace any screws or clamps that secure the air filter in place.
#4. Check if the filter is secured
Double-check that the air filter is properly secured and that all clamps or screws are securely tightened.
Test the air filter
Here are the steps that you should follow to test the air filter of your Harley-Davidson motorcycle –
#1. Let the bike run for a few minutes
Start your Harley-Davidson motorcycle and let it run for a few minutes to ensure the filter is functioning properly.
#2. Check for signs of air leaks
You should also check the air filter for any signs of air leaks, like unfiltered air entering the engine or unusual noises.
#3. Recheck the installation
If you get any issues, you should turn off your bike and recheck the installation of the air filter. If there are no issues, you can take your Harley for a short ride to ensure you’re getting proper performance.
Troubleshooting common air filter problems
Harley-Davidson bikes typically come with a stock air filter designed to keep dirt, dust, and debris out of the engine and allow for optimal performance. However, there are a few common problems that you may encounter with stock Harley air filters. These problems can affect the performance of your bike if not fixed. Here is how you can troubleshoot common air filter problems –
#1. Damaged air filter
The stock air filter on a Harley-Davidson motorcycle can become damaged over time because of wear and tear, improper installation, or exposure to the elements. This can result in unfiltered air entering the engine and causing damage to internal parts.
To resolve the issue, you should check the air filter for potential signs of damage, such as cracks, tears, or holes. If you notice any damage, you should replace the air filters as soon as possible to prevent any potential damage to your engine.
#2. Improperly installed air filter
If the air filter isn’t installed properly, it can cause air leaks or restrict airflow to the engine, which can lead to decreased performance and increased emissions.
To troubleshoot the issue, you should check the air filter installation to make sure that it is seated properly in the housing and that all clamps or screws are securely tightened. Double-check that the filter is properly secured before testing.
#3. Dirty air filter
Over time, the stock air filter on your Harley-Davidson motorcycle can become clogged with dirt and debris, restricting the airflow to the engine. This can result in decreased performance, increased emissions, and poor fuel economy, among other problems.
The best way of troubleshooting this issue would be to regularly clean and maintain the air filter. If you notice decreased performance, increased emissions, or poor fuel economy, it’ll be a good idea to check the air filter and clean it if needed.
#4. Aftermarket air filter affecting the performance
Some riders may choose to install an aftermarket air filter on their Harley-Davidson bike, which can affect the performance of the engine.
If you notice decreased performance or increased emissions after installing an aftermarket air filter, it may be best to consult a professional mechanic to ensure proper installation and compatibility with your bike.
Drawbacks of not cleaning the stock Harley air filter
Not cleaning the stock air filter on your Harley-Davidson motorcycle can have many significant drawbacks. Here are some of the drawbacks that’ll give you an idea of why it is important to clean the air filter regularly –
#1. Decreased performance
A dirty air filter can result in decreased performance of the motorcycle. When the air filter becomes clogged with dirt and debris, it can restrict the flow of air to the engine, which can result in reduced power, decreased fuel economy, and slower acceleration.
#2. Increased emissions
A dirty air filter can also increase the emissions from your Harley-Davidson motorcycle. When the engine isn’t receiving enough air, it cannot properly burn the fuel, which can often lead to incomplete combustion and increased emissions.
#3. Increased maintenance cost
Not cleaning the air filter can result in increased maintenance costs over time. A dirty air filter can result in engine damage, which can lead to costly repairs or replacement.
#4. Reduced lifespan
If the air filter isn’t cleaned regularly, it could cause damage to your motorcycle’s engine. Dirt and debris can scratch and wear down the engine components, which can greatly reduce the lifespan of your bike.
#5. Safety hazards
A dirty air filter can also result in safety hazards. If the engine isn’t running smoothly, it can cause the bike to stall or stop unexpectedly, which can be quite dangerous when driving on the road.
FAQs
What is the best way to clean a stock Harley air filter?
The best way to clean a stock Harley air filter is to use a filter cleaning kit. This kit contains a filter cleaning solution, filter oil, and a brush to effectively clean and lubricate the air filter. It is important to ensure that the air filter is completely dry before re-oiling to ensure maximum efficiency.
What other maintenance should be done on a stock Harley air filter?
In addition to cleaning the air filter, it is also important to inspect it regularly for any signs of wear or damage. If the air filter is damaged or worn, it should be replaced as soon as possible to ensure optimal performance.
What are the benefits of cleaning and maintaining a stock Harley air filter?
Cleaning and maintaining a stock Harley air filter can help to improve fuel efficiency, engine performance, and airflow. This can also help to prolong the life of the air filter and ensure optimal performance of the motorcycle.

