If you own a Harley Davidson, you know that its performance is dependent on your ability to adjust the clutch cable.
To adjust the clutch cable, locate the adjuster near the clutch lever. Loosen the locknut, turn the adjuster to remove slack or increase tension, and then retighten the locknut to secure the setting.
This tutorial will provide a step-by-step guide to help you adjust your clutch cable with ease. With this guide, you’ll be able to make sure that your Harley Davidson is running smoothly and properly. Let’s get started!
What does clutch cable do in a Harley-Davidson motorcycle?
When it comes to motorcycles, Harley-Davidson holds a special place in the hearts of bikers worldwide. One of the most important components that ensure a seamless ride and effortless ear shifting then it is definitely the clutch. The clutch cable is an often overlooked component but it plays a pivotal role in transmitting the rider’s input to the bike’s clutch system.
It serves as the vital link between the clutch lever and the clutch mechanism on a bike. It will allow you to engage and disengage the clutch effectively, facilitating smooth gear changes and control over the bike’s power delivery. Without a properly functioning clutch cable, shifting gears will be a cumbersome and inefficient process.
The working mechanism of a clutch cable is quite simple. The rider initiates the gear shift by pulling the clutch lever towards the handlebar. This action compresses the clutch cable, transmitting the force to the clutch mechanism.
The clutch cable is composed of a series of wires or strands wound together, encased with a protective outer sheath. Once the clutch lever is pulled, the cable will be tensioned, causing it to transmit the force applied by the rider. As the force from the clutch lever is transmitted through the cable, it’ll reach the clutch assembly. In Harley-Davidson bikes, the clutch assembly typically involves a series of friction plates and metal plates. The force from the clutch cable will cause these plates to separate disengaging the clutch and interrupting power transmission from the engine to the drivetrain.
With the clutch disengaged, the bikers will be able to smoothly shift gears using the bike’s foot-operated gear shifter. The absence of power transmission for the drivetrain will allow for a seamless transition between gears. Releasing the clutch lever gradually will allow the clutch cable to return to its resting position, relieving the tension. As the cable relaxes, the clutch plates will re-engage and power will be transmitted from the engine to the drivetrain again.

Tools and materials required to adjust a clutch cable on Harley-Davidson bikes
Adjusting the clutch cable on a Harley-Davidson bike is a key maintenance task that ensures proper clutch engagement and smooth gear shifting. For performing this adjustment, you will require a set of tools to facilitate this process. Here are some of the essential tools required for adjusting the clutch cable on Harley-Davidson bikes, helping you prepare for the task.
#1. Wrench set
A high-quality set of wrenches is a must-have for any motorcycle maintenance task, including adjusting the clutch cable. An adjustable wrench will allow you to take a wide variety of nut and bolt sizes. Make sure that you have one that fits the sizes typically found on Harley-Davidson bikes.
Open-end wrenches come in different sizes and are useful for turning hexagonal nuts and bolts. You should have a selection of open-end wrenches that cover the range of sizes needed for your specific bike model.
#2. Cable adjuster tool
A cable adjuster tool is designed specifically to adjust the tension of the clutch cable. It generally features a slot or hole that fits over the cable adjuster, providing a comfortable grip for turning and adjusting the cable tension.
#3. Pliers
Pliers are extremely versatile tools that come in handy for different maintenance tasks, including adjusting the clutch cable. Remember there are different types of pliers in the market.
Needle-nose pliers are perfect for reaching into tight spaces and gripping small components. They are extremely useful for manipulating cable ends and accessing hard-to-reach areas during the adjustment process. Meanwhile, slip-joint pliers come with an adjustable jaw width and they can be used for numerous tasks like gripping and holding components during cable adjustments.
#4. Screwdriver set
A set of screwdrivers will be important for removing screws, bolts, and other fasteners during the clutch cable adjustment. You should ensure that you have both flat-head and Phillips-head screwdrivers in different sizes to cover the different types of fasteners on your bike.
#5. Torque wrench
A torque wrench is needed for tightening bolts to the manufacturer’s specified torque values. This tool will ensure that you are able to achieve the proper tightness without overtightening, which could result in damage.

How to adjust a clutch cable on Harley-Davidson bikes?
Adjusting the clutch cable is an important task that you must carry out if you want your Harley-Davidson bike to run smoothly and efficiently for a long time. Once you have prepared your bike for adjustment by gathering the necessary tools and materials, you will be in an ideal position to get started. Here are the steps you need to follow to adjust a clutch cable on your Harley-Davidson bike.
Step 1: Removing the clutch cable cover
Designed for protecting the clutch adjuster mechanism from dust, dirt, water, or airborne arthropods, the clutch cable cover is the accordion-looking piece of rubber resent around halfway between the handlebars and the bottom of your bike’s frame.
For most Harley-Davidson bikes, you will have to adjust the clutch cable before getting down to work on the clutch itself. The clutch cable cover is not that difficult to find. Once you do find it, you will have to simply slide it up or down to reveal the clutch cable adjuster mechanism present underneath.
Step 2: Adjusting the clutch cable
Once the clutch cable cover has been removed, you will have to add slack to the cable. This is important as it’ll ensure that the cable has no effect on the clutch as it is being adjusted later on. By adding slack into the clutch cable, what you’re doing is collapsing the cable housing that the cable is pushing against. By doing this, you are essentially removing any tension. Once you have done that, you will be able to squeeze the clutch lever all the way without much resistance.
If you are looking to add slack into the clutch cable, take a wrench and lock it onto the adjuster. For instance, say that the wrench is ½ inch. After securing the wrench to the cable clutch adjuster, make use of another wrench for loosening the jam nut secured to the clutch adjuster.
The jam nut will be used for holding the adjuster to proceed. To proceed, you will have to dial the jam nut all the way back. This creates the room needed for the cable adjuster to be dialed back. You need to make sure that you are doing this to the point the adjuster bottoms out. All the tension on the clutch cable should be released.
Step 3: Removing the derby cover
You can think of the derby cover as Captain America’s trusty shield. Although it will definitely look and feel fantastic when it is clean and well-polished, it is actually a purpose-driven piece of equipment. A derby cover has a solitary purpose – to give you a simple and easy access point to do this job. For removing the derby cover, you won’t have to do much more than simply unscrewing a few bolts that are holding it in place.
Step 4: Loosening the nuts on the clutch adjuster
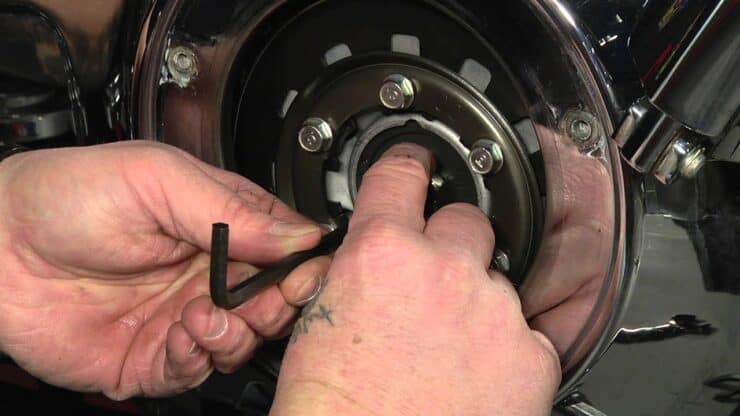
Similar to the clutch cable adjuster, the clutch adjuster will also make use of a jam nut for keeping things in place. To break free of this, you should be using a wrench for the nut itself and a hex key to hold the clutch adjuster in place when you are working on it. It is definitely possible that your bike will require a screwdriver rather than an Allen key.
For the sake of simplicity, when an Allen key is mentioned in these instructions, you can just replace it with a “screwdriver” if your bike requires the latter. Irrespective of the tool you use, when you’re adjusting the clutch, you must be sure that you loosen the jam nut all the way.
Step 5: Adjusting the clutch
Now, you are in a position to adjust the clutch. using your fingers, you should tighten the clutch adjuster until it has bottomed out. Remember not to torque it or pinch it hard, instead, try to ensure that it is really snug. Once it bottoms out, you have reached your desired destination.
Once your clutch adjuster has bottomed out, you need to insert your screwdriver or Allen key. You’ll need to check the service manual specifics and once you’re done, it’ll give you a set point (1/2 turn) or a range (1/2 to ¾ turns). The exact range of turns could vary depending on a specific feel as the exact wear level of parts and preferences come into the picture. A general rule of thumb for 4-6 speed setups will involve turning back the screwdriver or Allen key counterclockwise one half turn. If you’re inserting your Allen key/screwdriver and it is pointing to 6 o’clock, you should pick it back in time to 12 o’clock.
After making the turn, you should be running the jam nut back down by hand for tightening things back. As you’re doing so, make sure that you keep the screwdriver or Allen key in position to hold the clutch adjuster steady. If you don’t, it’ll be likely that you might end up inadvertently twisting it out of the ideal position. You must finalize this step by making use of a wrench to fully tighten the jam nut. However, remember that you shouldn’t over-torque.
Step 6: Re-installing back the derby cover
Once you have are done working with the clutch and clutch adjuster, it’ll be time to put everything back in its place and re-install the clutch cover. This is quite simple to do.
You should start with your fingers and put the bolts in place. Not only is it extremely easy and quite efficient, it’ll also eliminate the chance that you might tighten down any individual bolt too soon. With all the bolts in place, make use of your screwdriver or torque wrench to put the finishing touch. You must remember the order in which you’re doing this can make a big difference. At this stage, you’ll want to tighten down bolts that are opposite to each other.
Step 7: Adjusting the clutch cables once again
In this step, you will simply have to repeat what you did in step 2 but in reverse. If you had squeezed the clutch lever for testing the reduction of tension before, you’ll now start seeing it creep back into its position. You shouldn’t fret as this isn’t the work of an invisible ghost. It is simply the effect of the tension returning to the clutch cable.
For checking your progress, you will simply have to keep tabs on the play in the clutch lever. You should refer to the owner’s manual but it’ll typically be somewhere in the range of 1/16 inch as it is a decent amount of free play. Once you get the tension that you want, you should re-tighten the jam nut to the clutch cable adjuster.
Step 8: Re-installing the clutch cable cover
Have a little patience, you are almost done. Although the excitement to return to thundering down open roads and highways and intimidating other bikers can be immense, you shouldn’t forget to re-install the cable clutch cover back into place before you finish up.
Final checks and testing of the adjusted clutch cable settings
Once you have adjusted the clutch cable on your Harley-Davidson bike, it’ll be important that you perform a series of final checks and testing to ensure that the clutch is functioning optimally. By checking the clutch cable and taking your bike out for a run, you’ll be able to verify the effectiveness of the adjustments and guarantee a smooth and reliable riding experience. Here is how you can carry out the final checks and testing for a Harley-Davidson bike with an adjusted clutch cable.
Step 1: Visual inspection
Begin by conducting a visual inspection of the clutch cable and its components. Make sure that the cable is properly aligned, free from any kinks or twists, and securely fastened at both ends. You must examine the cable adjusters, cable ferrules, and O-rings for signs of damage or wear. If you are noticing any issues during the inspection, you must address them before you proceed with the test.
Step 2: Cable tension check
With the Harley-Davidson bike on its center stand or in an upright position, you must pull the clutch lever towards the handlebars and observe the movement of the clutch cable. The cable needs to move smoothly and without any excessive resistance or binding. Make sure that there is sufficient play in the clutch lever before the cable starts engaging the clutch mechanism. You need to adjust the cable tension using the cable adjusters if needed after referring to your bike’s owner’s manual for specific instructions.
Step 3: Clutch engagement
You should engage the clutch lever and put your Harley into gear. Slowly release the clutch lever while simultaneously giving a small amount of throttle. You should observe how smoothly the clutch engages and the bike starts to move forward. The clutch engagement needs to be gradual and seamless, without any slipping or sudden jerks.
Step 4: Clutch disengagement
For checking the clutch disengagement, you must pull the clutch lever toward the handlebar while giving a throttle. The engine must rev freely without any resistance from the clutch. If you’re noticing any dragging or unusual noises during the test, it might indicate that the clutch isn’t fully disengaging. Revisit the cable tension adjustment if necessary.

Step 5: Gear shifting
When riding your bike, you must test the gear-shifting process. You need to shift through the gears, paying close attention to how smoothly and effortlessly the transmission engages each gear. Make sure that there are no hesitations, grinding noises, or difficulty in engaging or disengaging gears. A well-adjusted clutch cable should ideally facilitate smooth gear changes.
Step 6: Test ride and fine-tune
Take your Harley for a test ride, preferably on different road conditions for evaluating its overall performance. You must pay close attention to the clutch operation during acceleration, deceleration, and when navigating corners. Make sure that the clutch engages and disengages smoothly without any slippage. The overall power delivery should feel controlled and consistent.
During test riding, you should make note of any minor issues or abnormalities that you observe with the clutch. If needed, you should fine-tune the clutch cable tension by adjusting the cable adjusters. It might require numerous iterations of adjustment and test rides for achieving the desired clutch performance.
Maintenance tips for clutch cable
The clutch cable plays a significant role in the proper functioning of your Harley-Davidson bike’s clutch system. However, over time, your clutch cable will experience wear and tear, affecting its performance and potentially causing issues while shifting gears. To ensure you get a smooth and reliable riding experience, regular maintenance of the clutch cable will be essential.
Regular inspection
Performing routine inspections of the clutch cable will be vital as it’ll help you identify any signs of wear and damage. You need to check for things like cable fraying, cable tension, and lubrication.
Check for any cable fraying or unraveling of the cable wires. Even minor fraying could compromise the cable’s integrity, resulting in potential failure. You should make sure that the clutch cable is tensioned properly. It must have a slight amount of play without being too loose or too tight. Adjust the tension if needed according to the bike’s specifications. Inspect the cable for any signs of dryness or lack of lubrication.
Lubrication
Proper lubrication of the clutch cable will be important to maintain its smooth operation. To do that, you’ll need to use the appropriate lubricant on a regular basis. You must choose a high-quality cable lubricant specifically designed for Harley-Davidson motorcycle cables. You should avoid using general-purpose lubricants as they might attract dirt and debris, resulting in cable damage.
You must apply lubricant to the clutch cable at regular intervals as recommended by your bike’s owner’s manual. This will prevent the clutch cable from drying out, reduce friction, and ensure smooth cable movement. You need to apply the lubricant at the ends of the cable and allow it to penetrate the inner cable housing. Work the clutch lever several times to ensure the lubricant reaches all the necessary components.
Also read: The What and Why of the Harley Compensator?
FAQs
What is the purpose of adjusting the clutch cable on a Harley Davidson?
Adjusting the clutch cable on a Harley Davidson is necessary to ensure that the clutch lever is properly engaged and disengaged. The adjustment involves setting the free play at the lever, which ensures the cable is not too tight or too loose, allowing for smooth clutch operation.
How do I adjust the clutch cable on a Harley Davidson?
Adjusting the clutch cable on a Harley Davidson involves loosening the two pinch bolts on the clutch cable adjuster, setting the free play of the lever, and tightening the pinch bolts. It’s important to make sure the clutch lever is not too tight or too loose, and that the cable is not binding in any way.
What should I do if the clutch cable is not adjusting properly?
If the clutch cable is not adjusting properly, it may be due to a worn or damaged cable, or the clutch lever may be out of alignment. In this case, it’s best to take the bike to a qualified mechanic who can assess the issue and make any necessary repairs.

