Are you the proud owner of a Harley-Davidson? If you are, you may be wondering just how often you should be checking the oil level in your bike. The answer may surprise you, but it is an important question to answer.
Check the oil level on your Harley-Davidson at least once a month, or before long rides, to ensure optimal engine lubrication.
In this article, we’ll explore how often you should be checking your oil level and why it matters. Keep reading to find out more, and you’ll be well on your way to understanding how to take better care of your Harley-Davidson.
Importance of oil in a Harley-Davidson motorcycle
When you think of Harley-Davidson motorcycles, one of the first things that probably come to mind is the iconic rumble of a V-twin engine. These bikes come with powerful engines, stunning designs, and comfortable rides to help you enjoy the freedom of the open road and the spirit of American motorcycle culture. At the heart of these exceptional bikes lies the lifeblood of these bikes – oil. Oil plays a key role in keeping a Harley-Davidson bike running smoothly and its importance simply cannot be overstated.
>>> Click here to read our review of the Best Oil For Harley-Davidson <<<
One of the primary functions of oil in a Harley-Davidson bike is to provide lubrication to the engine’s moving parts. The V-twin engine, a hallmark of Harley-Davidson bikes, features multiple cylinders and a complex array of pistons, valves, and camshafts that work in unison to generate power. The oil forms a thin film between these components, reducing friction and preventing metal-to-metal contact, which could otherwise result in excessive wear and tear.
Proper lubrication provided by the oil will ensure that the engine runs smoothly and efficiently, allowing your bike to deliver the iconic performance and power it is known for.
Harley-Davidson bikes are renowned for their ability to cover long distances on the open road. As the engine powers through miles of riding, it generates significant heat. As the engine powers through miles of riding, it generates significant heat. The oil plays a vital role in absorbing and carrying away this excess heat, preventing the engine from overheating.
Proper heat dissipation is important to protect the engine from damage and maintain its performance over the long haul. Without adequate cooling from the oil, components could warp or seize, resulting in costly repairs and potentially leaving you stranded on the roadside.
In addition to lubrication and heat dissipation, oil in a Harley-Davidson bike also acts as a cleaning agent. As the engine operates, it will inevitably produce by-products, such as carbon deposits and tiny metal particles from the wear and tear of moving components. The oil carries these contaminants away, keeping them suspended in the oil until they can be filtered out by the oil filter.
Regular oil changes are important for preventing these contaminants from accumulating in the engine, which can compromise performance and lead to engine damage. Fresh, clean oil will ensure that your Harley-Davidson bike continues to perform at its best, mile after mile.
Oil also plays a key role in maintaining the integrity of seals and gaskets within the engine. The oil helps keep these components pliable and prevents them from drying out or cracking. Well-maintained seals and gaskets are important for preventing oil leaks, ensuring that oil remains where it should be and that the engine operates efficiently.

How often should I check the oil level on my Harley-Davidson?
Owning a Harley-Davidson bike is more than just a mode of transportation, it is a passion and a way of life. To keep your Harley-Davidson motorcycle running smoothly and roaring with power, proper maintenance will be important. Among the important maintenance tasks, checking the oil level regularly is one of the top tasks on the list.
One of the questions you will likely have is how often should I check the oil level on my Harley-Davidson. While daily checks are recommended before every ride, there are specific occasions when giving your Harley-Davidson engine a little extra attention will be important. There are numerous different instances in which you should consider checking the oil. These instances will remind you that the oil level needs refilling. Here is how often you should be checking the oil level in your Harley-Davidson bike.
Before each ride
Checking the oil level in your Harley-Davidson bike before each ride should be a pre-ride ritual, similar to putting on your riding gear. Before you start your engine, take a few moments to inspect the oil level.
Make sure that your motorcycle is parked on a level surface and that the engine has cooled down. With your bike upright, remove the oil dipstick, wipe it clean, reinsert it, and then remove it once more to check the oil level. This practice will not only confirm that you’ve got sufficient oil but also allow you to detect any sudden leaks or abnormalities that might indicate an issue.
After long rides
After long rides, especially on hot days or when traveling through challenging terrains, it is advised that you should check the oil level in your Harley-Davidson bike. Prolonged riding can result in increased engine heat and possible oil consumption. By verifying the oil level after an extended ride, you’ll be able to ensure that the engine hasn’t experienced any excessive oil loss or depletion.
After washing the bike
Washing your Harley-Davidson motorcycle is a regular part of its maintenance routine. However, the process of washing can inadvertently displace or expose seals, potentially causing oil leaks. After washing your motorcycle, you should take a moment to re-check the oil level. While oil leaks are relatively rare on well-maintained Harley-Davidson bikes, it is a proactive measure to make sure that everything is in order after cleaning.
After bad weather
Bad weather conditions, such as heavy rain, thunderstorms, or dusty environments can end up putting additional stress on your Harley-Davidson bike’s engine. Riding in such conditions might cause water or debris to find its way into the engine or the oil reservoir.
After you encounter bad weather, it’ll be important to check the oil level as a part of your post-ride inspection. Make sure that the engine is cool and the bike is parked on a level surface before you examine the oil level. This precaution will help you identify any water or contaminants that might have entered the oil, protecting the engine from potential damage.
After storage
If you have stored your Harley-Davidson bike for an extended period of time, such as during winter or a prolonged hiatus, checking the oil level will be important before firing up the engine for the first time.
During storage, the oil might settle or experience slight evaporation, potentially affecting the oil level. Before you start your bike, you should perform a thorough pre-ride inspection, including checking the oil level. If the oil level is lower than normal, you should top it up to the appropriate level with the recommended oil type before embarking on your first ride after storage.
How frequently should you change oil?
Regular oil changes will be important for maintaining your Harley-Davidson bike’s engine health. After you or a professional mechanic have performed an oil change, it’ll be important to double-check the oil level to ensure that it was correctly refilled and reaches the appropriate level on the dipstick. Harley-Davidson recommends that every rider should preferably use SAE 20W-50 or the Mobil 1 20W-50 V-twin synthetic motorcycle motor oil.
In addition to regularly checking the oil level, it’ll be important to adhere to the manufacturer’s recommended oil change intervals. Typically, Harley-Davidson bikes require an oil change once every 2,500 to 5,000 miles depending on the specific model and oil type used. Regular oil changes will help maintain the engine’s health as fresh oil will provide optimal lubrication and help remove contaminants.
To get precise guidance on how often should I check the oil level on my Harley-Davidson bike, you must refer to your bike’s owner’s manual. Harley-Davidson bike provides detailed recommendations and guidelines tailored to each specific model. Following the manufacturer’s advice will ensure that you are maintaining your motorcycle in accordance with their expert recommendations, giving you assurance and peace of mind.

How to check the oil level in your Harley-Davidson bike?
Maintaining the engine oil at the proper level will be important for the performance and longevity of your beloved Harley-Davidson bike. Regularly checking the oil level is a simple yet essential maintenance task that needs to be a part of every rider’s routine. Here are the steps you need to follow for checking the oil level in your Harley-Davidson motorcycle.
Step 1: Preparing for the check
Before you start checking the oil level, make sure that your Harley-Davidson bike is parked on a level surface and the engine has cooled down. It will be best to check the oil level when the engine is cool to get an accurate reading. If you have recently ridden your motorcycle, allow it to sit for a few minutes to allow the oil to settle.
Step 2: Finding the oil dipstick
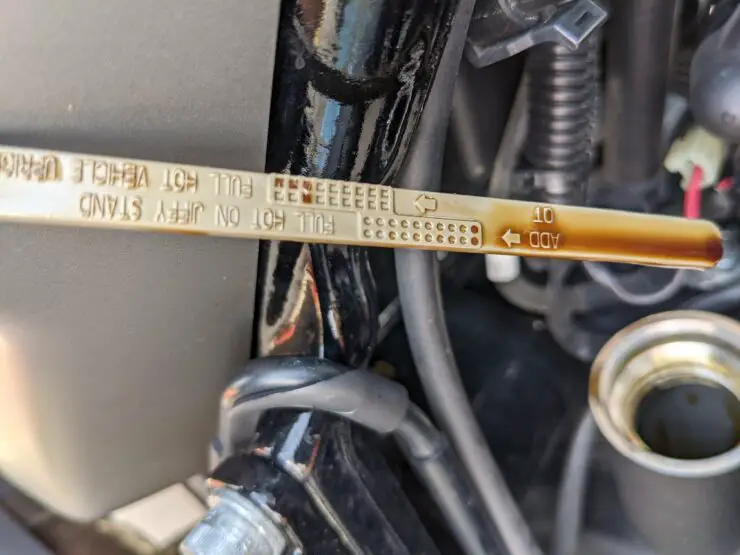
Locating the oil dipstick will be the next step in checking the oil level. The oil dipstick on most Harley-Davidson models is typically located on the right side of the engine, near the rear cylinder. It is a metal rod with a handle, designed for easy grip and access. The dipstick would be marked with a “Low” and “Full” indicators, denoting the acceptable oil level range.
Step 3: Checking the dipstick
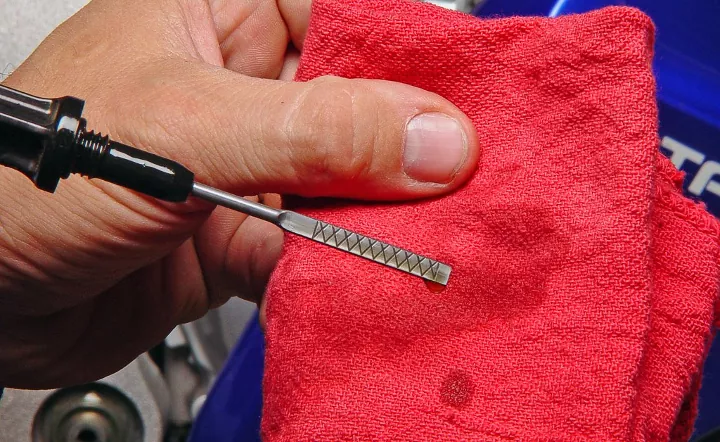
With your bike in an upright position, you should carefully remove the oil dipstick from its housing. Wipe any excess oil off the dipstick with a clean cloth or paper towel. Now, you should reinsert the dipstick back into its housing until it sits securely but doesn’t screw it in.
Count to three and then remove the dipstick once more. Hold it horizontally and observe the oil level on the dipstick. Ideally, the oil level must be between the “Full” and “Low” indicators on the dipstick. If the oil level is below the “Low” mark, it’ll indicate that you need to add more oil.
Step 4: Adding oil
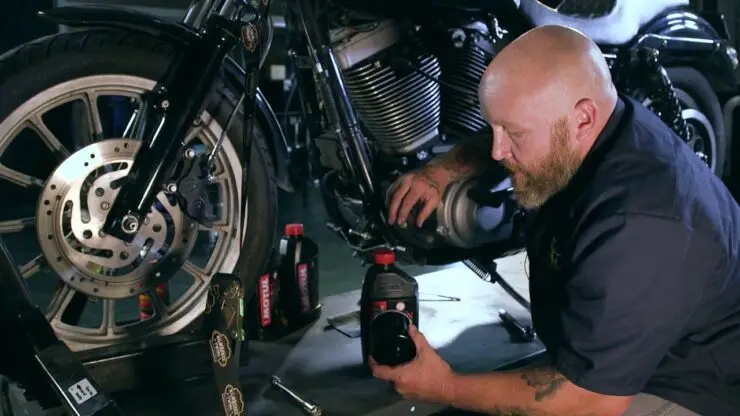
If the oil level is below the “Low” mark, it’ll be time to add oil. Use the appropriate type of oil recommended by Harley-Davidson for your specific model. Refer to your owner’s manual for the correct oil specifications.
To add oil, use a funnel to avoid any spills or overfilling. Slowly pour a small amount of oil into the oil filter neck. Recheck the oil level with the dipstick after adding the oil. Continue to add oil in small increments until the level is between the “Full” and “Low” marks on the dipstick.
Step 5: Final check
Once you have reached the ideal oil level, you should securely screw the dipstick back into its housing. Make sure that it is tightened properly for preventing oil leaks. Clean any spilled oil around the oil filler neck and dipstick area.
Benefits of regularly checking the oil in a Harley-Davidson bike
A Harley-Davidson bike embodies the essence of freedom and adventure on the open road. To ensure that your Harley-Davidson bike continues to roar with power and performance, one of the most important maintenance tasks is regularly checking and changing the oil. Proper oil maintenance is the key to preserving the heart of your motorcycle’s engine and enjoying countless miles of exhilarating rides. Here are the different benefits of regularly checking and changing oil in a Harley-Davidson bike.
#1. Engine lubrication and friction reduction
The V-twin engine, a hallmark of Harley-Davidson bikes, consists of multiple cylinders and intricate moving parts that work in harmony to generate power. Regularly changing the oil will ensure that these components are adequately lubricated, reducing friction and preventing excessive wear and tear. Proper lubrication is important for maintaining the smooth operation of the engine, ensuring optimal performance and longevity.
#2. Heat dissipation and engine cooling
As you cruise down the open road, your Harley-Davidson engine generates considerable heat. The oil will act as a cooling agent, absorbing and carrying away excess heat, preventing the engine from overheating. Regular oil changes will help maintain proper heat dissipation, protecting the engine from damage and avoiding potential breakdowns due to overheating.
#3. Contaminant removal and engine cleanliness
Over time, engine oil accumulates contaminants, such as dust, dirt, carbon deposits, and metal particles resulting from the natural wear of engine components. As the oil becomes saturated with these contaminants, its ability to lubricate and protect the engine diminishes. Regularly changing the oil will remove these harmful contaminants, keeping the engine clean and free from debris.
#4. Improved fuel efficiency
Fresh and clean engine oil will reduce friction and improve engine efficiency, which translates to better fuel economy. Regularly checking and changing the oil will ensure that your Harley-Davidson bike operates at its best, allowing you to enjoy more miles on each tank of fuel.
#5. Extended engine life
A well-maintained engine is less prone to premature wear and breakdowns. Regular oil changes prevent engine components from grinding against each other, reducing the risk of costly repairs and extending the overall life of the engine. With proper oil maintenance, your Harley-Davidson bike can accompany you on countless adventures for years to come.
#6. Enhanced performance and ride quality
A Harley-Davidson bike is more than just a means of transportation, it is a symbol of freedom and individuality. Regularly checking and changing the oil will ensure that your motorcycle’s engine delivers the signature performance and power that Harley-Davidson is renowned for. With a well-maintained engine, you will be able to confidently take on challenging terrains and enjoy a smooth, exhilarating ride.
#7. Maintaining resale value
For many Harley-Davidson riders, their bikes hold sentimental value, becoming a part of their identity and lifestyle. Regularly maintaining the engine with oil changes will not only preserve the performance of the bike but also maintain its resale value. A well-maintained Harley-Davidson bike will be more appealing to potential buyers, ensuring that your investment retains its worth over time.

Common issues and how to troubleshoot them
A Harley-Davidson bike is a symbol of freedom, power, and the open road. To make sure that your motorcycle continues to roar with performance and reliability, proper oil maintenance will be important. However, even the most well-maintained bikes might encounter oil-related issues over time. Here are some of the common oil-related issues in a Harley-Davidson motorcycle and how you can troubleshoot them.
Low oil levels
Low oil levels can be detrimental to your Harley-Davidson bike’s engine health, resulting in inadequate lubrication and increased friction. Low oil levels are often a sign of oil consumption, leaks, or failure to top up the oil after an oil change. Here is how you can troubleshoot this issue.
Before each ride, you must check the oil level using the dipstick as mentioned above. If the oil level is consistently low, look for any signs of oil leaks around the engine, oil filter, or drain plug.
Address any visible leaks by tightening loose bolts, replacing worn-out gaskets, or fixing damaged seals. If you are unable to identify the source of the leak, it’ll be best to seek professional assistance from a Harley-Davidson service center.
If your motorcycle consistently experiences low oil levels without any visible leaks, you should consider consulting with a mechanic to check for potential internal engine issues.
High oil levels
Excess oil in your Harley-Davidson bike can lead to foaming, decreased performance, and potential engine damage. High oil levels might occur due to overfilling during an oil change or due to fuel contamination. Here is how you can troubleshoot this issue.
After the oil change, make sure that you add the correct amount of oil according to the manufacturer’s recommendations. Refer to the owner’s manual for the precise oil capacity. If the oil level remains high even after adjusting it during an oil change, you should consider draining some excess oil to achieve the proper level.
Oil leaks
Oil leaks are a common problem in Harley-Davidson motorcycles and can result in low oil levels and potential engine damage if left unaddressed. Here is how you can troubleshoot oil leaks.
- Inspect the engine and other components for visible signs of oil leakage, such as oil accumulation on engine parts or oil spots on the ground
- Check the oil filter, gaskets, and drain plug for tightness and integrity
- Replace the damaged seals or gaskets as needed
- Regularly check for oil leaks after each ride and address them promptly for preventing further complications
Burning oil
Burning oil can result in blue smoke coming from the exhaust and can be caused by worn-out piston rings, valve seals, or a damaged cylinder wall.
If you notice blue smoke from the exhaust, you should consult a qualified mechanic for performing a compression test and check for any engine issues. Address the worn-out piston rings, valve seals, or cylinder wall damage promptly for preventing further oil burning.
FAQ
What type of oil should I use for my Harley-Davidson?
For optimal performance and engine life, you should use Harley-Davidson motorcycle oil in your Harley-Davidson. This oil is designed specifically for Harley-Davidson engines and meets or exceeds all OEM requirements.
How often should I check the oil level on my Harley-Davidson?
It is recommended to check the oil level on your Harley-Davidson every 500 miles or before every ride. Checking the oil level regularly will help you identify any issues with the engine and help you keep your bike running smoothly.
What happens if the oil level is too low?
If the oil level is too low, it can cause damage to your engine due to lack of lubrication. This can lead to wear and tear on the engine, overheating, and reduced performance. It is important to regularly check the oil level and top it up as needed to ensure your engine is properly lubricated.
>>> Read more about Oil for Harley-Davidson <<<

