If you’re looking for a smoother, more comfortable ride on your Harley-Davidson touring bike, then adjusting your seat is a great place to start.
To adjust your Harley touring seat, loosen the mounting bolts, reposition the seat slightly for optimal comfort, then retighten the bolts. Some aftermarket seats offer more adjustable features like lumbar support.
Whether you’re a Harley enthusiast who long ago mastered the art of making seat adjustments, or you’re a new rider in need of some guidance, this article will help you make the changes you need for a more enjoyable riding experience. Read on to learn the basics of adjusting your Harley-Davidson touring seat.
Adjusting options in Harley-Davidson Touring seats
When it comes to embarking on epic journeys on your Harley-Davidson Touring bike, rider comfort is important. The right touring seat can make a world of difference in ensuring you enjoy every moment on the road. Harley-Davidson understands that every rider is unique, which is why they offer different features to make adjustments in their touring seats. Here are the different adjusting options for Harley-Davidson Touring seats.
>>> Click here to read our review of the Best Harley-Davidson Touring Seat <<<
Seat height adjustment
The height of your seat can significantly influence your comfort and control on the bike. Harley-Davidson Touring seats come with adjustable seat height options, allowing you to easily find your optimal riding position.
By adjusting the seat height, you’ll be able to find a position that provides the right level of comfort and control. Riders with longer legs might prefer a higher seat for achieving a comfortable knee bend, while those with shorter legs can lower the seat for better reach to the ground.
Lowering the seat can improve your confidence when stopping at traffic lights or during parking. Being able to place your feet firmly on the ground will enhance stability when coming to a halt.
Adjusting the seat height can influence your riding posture and how you interact with the wind. Finding the right seat height will optimize your body’s aerodynamics, reducing wind resistance and fatigue during longer rides.
Seat tilt adjustment
The tilt of your touring seat plays a key role in maintaining a balanced riding posture. Harley-Davidson touring seats often allow riders to adjust the seat tilt to find the ideal balance between comfort and control.
The correct seat tilt can alleviate pressure points on your thighs and lower back, enhancing comfort during extended rides. Adjusting the tilt can help you find the sweet spot that supports your body’s natural contours.
The angle of your seat can influence how you distribute your weight on the bike. Finding the right tilt will ensure that your weight is evenly distributed, enhancing your ability to handle turns, curves, and various road conditions.
An improper seat tilt can result in discomfort and fatigue over time. By fine-tuning the tilt, you’ll be able to reduce the strain on your muscles and joints, allowing you to enjoy the journey without unnecessary discomfort.

Seat forward/backward placement
The placement of your seat in relation to the handlebars and foot controls can also impact your overall riding geometry. Harley-Davidson Touring seats often offer forward/backward adjustment options, allowing you to customize your riding position.
Adjusting the seat forward or backward can influence how comfortably you can reach the handlebars, controls, and foot pegs. Finding the right placement will ensure that your riding posture is natural and relaxed.
Proper seat placement enhances your control over the bike. Being in the right position will allow you to maneuver the bike more effectively, especially during turns and slow-speed maneuvers.
Adjusting the seat placement affects how the weight is distributed on the bike. Finding the optimal placement will ensure that your weight is balanced between the front and rear wheels, contributing to stability and control.
Tools needed for adjusting touring seats in your Harley-Davidson bike
Harley-Davidson Touring seats come with a number of adjustable features that allow you to personalize your riding experience. Whether it is tweaking the seat height, adjusting the tilt, or finding the perfect placement, having the right tools on hand will make the process smooth and hassle-free. Here are some of the essential tools that you will need for adjusting the touring seats in your Harley-Davidson bike, ensuring you are ready to hit the road in maximum comfort.
#1. A hex key set
A hex key set is a must-have tool for adjusting the touring seats on your Harley-Davidson bike. Many of the adjustable features on Harley-Davidson bike’s touring seats, such as seat height, tilt, and placement are secured with Allen screws. Having a variety of Allen wrench sizes will ensure that you can access and loosen these screws for adjustments.
#2. Socket and ratchet set
A socket and ratchet set is important for dealing with nuts and bolts. Some seat adjustments might require loosening or tightening bolts that secure the seat to the bike’s frame. Having a socket set with a range of sizes will allow you to work with various bolt sizes and ensures a secure and stable seat adjustment.
#3. Torque wrench
When making adjustments to your touring seat, it is important to ensure that all bolts and screws are tightened to the manufacturer’s specifications. A torque wrench will allow you to apply the precise amount of torque, preventing over-tightening and maintaining the integrity of the components. Refer to your motorcycle’s manual for the recommended torque settings for seat adjustments.
#4. Screwdrivers
Screwdrivers come in handy for a wide variety of adjustments on your touring seat. From minor adjustments to removing panels for better access, having a set of screwdrivers of different sizes and types (Phillips and flathead) will ensure that you are prepared for any situation.
#5. Adjustable wrench
An adjustable wrench or also known as a crescent wrench is a versatile tool for making adjustments on your bike’s touring seat. It is especially useful for adjusting nuts and bolts in tight spaces where a socket set might not fit. An adjustable wrench will allow you to tackle a wide range of tasks with a single tool.
#6. Pliers
Pliers are a handy tool for tasks that require a strong grip and precise maneuvering. You can use them for holding small parts, twisting wires, and providing extra leverage when making adjustments. Needle-nose pliers are especially useful for reaching into tight spaces.
#7. Protective gear
Adjusting your touring seat might involve working in close proximity to various components of your bike. To protect yourself, you must wear appropriate safety gear, such as gloves and safety glasses. It’ll prevent injuries from sharp edges, moving parts, or accidental contact.

How do I adjust my Harley-Davidson Touring seat?
Riding a Harley-Davidson bike is all about more than just the journey, it is all about making every mile count. Achieving maximum comfort on those long rides is important and this is where adjustable touring seats come into play. Whether you are fine-tuning the seat height, adjusting the tilt, or finding the perfect placement, knowing how do I adjust my Harley-Davidson Touring seat will be important. Here are the steps you’ll need to follow for adjusting touring seats in Harley-Davidson motorcycles to ensure your ride is as comfortable as it is exhilarating.
Step 1: Remove the seat
Before you make any adjustments to your touring seat, you will have to remove it from the bike. To do that, you will need to follow these steps.
First, you should locate the release mechanism. Depending on your motorcycle model, the seat release mechanism might be located beneath the rear of the seat or on the side near the tank. Then, locate the release lever. If it is a lever, lift or push it to disengage the seat latch. If it is a screw or knob, you should loosen it to release the seat.
Then, lift the rear of the seat. Once the latch is disengaged, you should gently lift the rear of the seat and slide it toward the rear of the bike to free it from the front mounting point. After that, lift the seat off. With the rear of the seat free, you should carefully lift the seat off the bike’s frame.
Step 2: Adjust the seat height
Start by locating the adjustment mechanism. The seat height adjustment mechanism might be under the seat or near the front mounting point. After that, you should loosen the adjustment screws. Make use of an appropriate tool, such as an Allen wrench, for loosening the screws securing the seat height adjustment.
Now, you should adjust the seat height. Lift or lower the seat to your desired height. Make sure that it is level and balanced. Once you have found the right height, you should securely tighten the adjustment screws to the manufacturer’s specifications. Use a torque wrench for precision.
Step 3: Adjust the seat tilt
Start by locating the tilt mechanism. The seat tilt adjustment mechanism is generally located under the seat, near the front mounting point. Then, use the appropriate tool for loosening the screws securing the seat tilt adjustment.
Now, adjust the seat tilt. Adjust the seat tilt to find the angle that offers optimal comfort and support for your riding posture. Once you have set the desired tilt, tighten the adjustment screws to ensure a secure fit.
Step 4: Adjust the seat’s forward/backward placement
Begin by locating the placement mechanism. The forward/backward adjustment mechanism can typically be found under the seat or at the rear mounting point. After that, you need to loosen the placement screws. Make use of the appropriate tool for loosening the screws securing the seat’s placement.
Now will be the time to adjust the placement. To do that, you need to slide the seat forward or backward to achieve the desired distance between the seat and handlebars. Lastly, you need to tighten the screws. After finding the optimal placement, you need to tighten the adjustment screws for maintaining stability.
How to reinstall the touring seat after adjustment in your Harley-Davidson bike
After you have adjusted the touring seat for the perfect riding position, the next thing you will need to do is securely attach the seat and tighten the fasteners. Proper reinstalling the seat will ensure not only your comfort but also your safety on the road. Here are the steps you must follow for reinstalling the touring seat after adjustment in your Harley-Davidson bike. This will allow you to complete the process of adjusting the touring seat on your Harley-Davidson bike.
Step 1: Attach the seat
Before you can start the process of attaching the seat, you need to make sure that you have aligned the seat’s front mounting point with its slot on the bike’s frame. This step is important for a secure and stable installation.
After that, you need to slide the seat forward, you should ensure that the front mounting point engages with the slot on the frame. This step will secure the front of the seat in place. After that, you should gently lower the rear of the seat onto the rear mounting point of the bike’s frame. Make sure that the seat sits securely and evenly on the rear mount.
Depending on your motorcycle’s design, you will either have a latch, screw, lever, or knob mechanism for securing the seat in place. Engage the latch or tighten the screw/knob to prevent any movement of the seat.
Step 2: Tighten the fasteners
Once the touring seat is properly positioned, it will be time to secure it by tightening the fasteners. This step will ensure that the seat remains stable during your rides. You need to follow certain steps for tightening the fasteners.
If you have adjusted the seat height, you should make sure that you tighten the adjustment screws to the manufacturer’s specifications. Make use of an appropriate tool, such as an Allen wrench, and apply the recommended amount of torque to ensure a secure fit.
For seat tilt adjustment, make use of the appropriate tool to tighten the adjustment screws. Again, you should follow the manufacturer’s recommended torque settings to prevent overtightening or loosening.
If you have adjusted the seat’s forward/backward placement, securely tighten the adjustment screws. Properly tightened screws will ensure that the seat remains in the desired position, maintaining stability during rides.
Engage the seat latch or tighten the screw/knob that secures the seat in place. This mechanism will vary depending on your motorcycle’s design but the goal will be to prevent any movement of the seat while you are riding.
Before you hit the road, you should double-check all fasteners to ensure they are properly tightened. You should gently try to move the seat to verify its stability. Make sure that the seat is secure and stable in its adjusted position.

Different types of touring seats in Harley-Davidson bikes
Touring on a Harley-Davidson bike is a quintessential experience, embodying the true spirit and thrill of the open road. As you’re indulging in long journeys, the comfort of your ride will become paramount. One of the most important components that contribute to comfort and safety is the seat. Harley-Davidson is a brand known for its high-quality motorcycle parts and the same applies to touring seats. You can find numerous different types of touring seats for your Harley-Davidson bikes in the market. Here are the different types of touring seats in Harley-Davidson bikes that allow you to get the ultimate cruising experience.
Stock seats
Stock seats are the default seating options that come with your Harley-Davidson touring bikes. These seats are designed to provide a comfortable and functional seating experience for most riders. Stock seats offer a level of familiarity, as they’re seats you test rode and experienced at the dealership.
Harley-Davidson engineers meticulously design stock seats to match the aesthetics of the motorcycle model. They ensure that the seat complements the overall look of the motorcycle, maintaining a consistent and cohesive design language.
These seats come as a part of the package when you purchase your bike. This makes them a cost-effective option for bikers who don’t want to invest in additional aftermarket accessories. While stock seats might provide a baseline of comfort, they might lack some of the advanced features and materials found in custom seats. This is because stock seats are designed to cater to an impressive range of riders with varying preferences.
Custom seats
Custom seats offer a personalized seating experience, as they’re designed to accommodate your body shape, size, and riding posture. This attention to detail ensures maximum comfort during long rides. Many custom seats feature high-quality materials that offer superior comfort and support. Memory foam, gel inserts, and premium upholstery contribute to a plush and ergonomic seating surface that reduces fatigue.
Custom seats often incorporate advanced ergonomic designs, distributing weight more evenly and reducing pressure points. This enhances blood circulation and minimizes discomfort during extended rides.
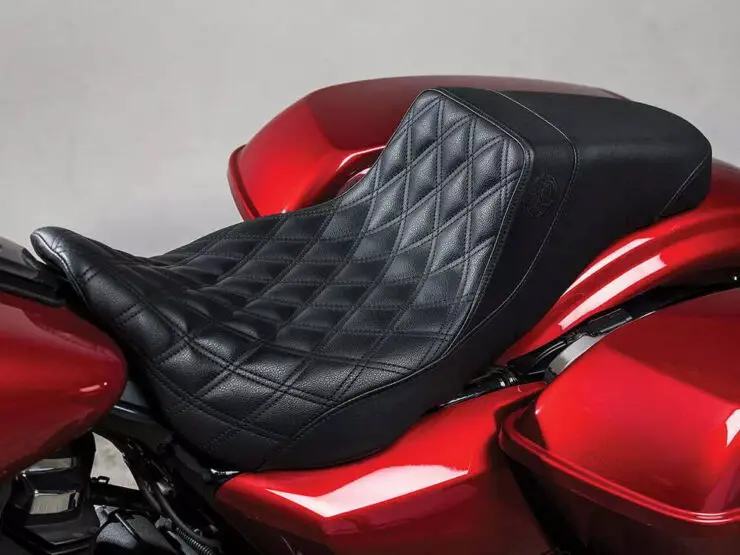
These seats give you the opportunity to add a touch of personal style to your bike. You can choose from various designs, stitching patterns, and materials to match your motorcycle’s aesthetics while standing out from the crowd.
Many custom seats come with added features like adjustable lumbar support, built-in backrests, and heated options for riding in colder climates. While custom seats are an additional investment, they can greatly enhance your riding experience, especially if you are a dedicated touring enthusiast. The improved comfort translates to reduced fatigue and a more enjoyable journey.
Solo seats
Solo seats are designed for bikers who prefer to ride alone and prioritize a minimalist look. These seats offer a clean and sleek profile, enhancing the overall aesthetics of the bike. These seats could provide comfort for shorter rides, making them perfect for those who enjoy occasional solo adventures.
Two-up touring seats
Two-up touring seats are designed to accommodate both the rider and the passenger. These seats offer a spacious and comfortable seating area for two, making them ideal for riders who frequently travel with a companion. Two-up touring seats often feature wider and well-padded designs to ensure the comfort of both occupants.
Heated-touring seats
For bikers who crave colder climates, heated touring seats offer a luxurious solution. These seats feature integrated heating elements that can be adjusted to offer warmth during chilly rides. Heated touring seats are a game-changer for those who wish to extend their riding season without sacrificing comfort.
Gel-infused touring seats
Gel-infused touring seats incorporate gel inserts within the seat cushion to provide enhanced comfort and support. Gel inserts distribute pressure more evenly, reducing the risk of discomfort and fatigue during long rides. These seats are designed to offer a plush and comfortable feel, making them perfect for bikers seeking optimal cushioning.
FAQs
What should I consider when adjusting my Harley-Davidson Touring seat?
When adjusting your Harley-Davidson Touring seat, it’s important to consider your height, weight, and riding style. You should also consider your comfort level and the length of the rides you typically take. The seat can be adjusted to provide a more upright riding position or a more relaxed and laid-back position.
How do I adjust my Harley-Davidson Touring seat?
Adjusting your Harley-Davidson Touring seat is relatively simple. First, ensure that the seat is securely attached to the bike. Then, loosen the seat bolts and move the seat forward or backward to find the best position for you. Make sure that the seat is secure and tightly fastened before riding.
What other accessories can I use to make my Harley-Davidson Touring seat more comfortable?
In addition to adjusting the seat, there are several other accessories that can make your Harley-Davidson Touring seat more comfortable. These include different seat covers, heated seats, and even air ride suspensions. With the right accessories, you can customize your Harley Davidson Touring seat to provide the best possible comfort and support.
>>> Read more about Harley-Davidson Touring Seats <<<

